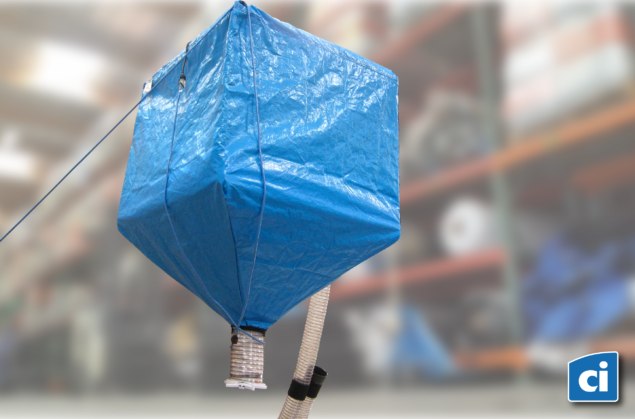
Loose-Fill P-Nut Dispensers
Economical
Gravity feed means no additional utility costs, a direct savings for you. Controlled delivery means no wasted material light- weight means lower shipping costs.
Saves Valuable Space
Utilizes overhead space so floor areas are kept clear. Model 015 is designed for low ceilings (down to 7'6").
High Efficiency
By dispensing right at the point of use, eliminate wasted steps.
Clean and Dustless
Gravity feed dispensers combined with free flowing cushioning material eliminates, dirty, heavy, hard to handle, cellulose wadding and shredded newspaper. Your product arrives safely, cradled in a protective and clean environment.
Fingertip Control
Enhance your project with a logo, text, or design that's certain to attract your audience.

Global Industrial Features:
• Standard Screwdriver
• Peanuts for packing feature interlocking shape to prevent contents from settling
• Economical, fast and easy to use void fill
• Made from green recycled polystyrene
| MODEL # | CAPACITY | SIZE | M.C.H. |
|---|---|---|---|
| #015 | 15 cu. ft. | 40" x 40" x 36" | 7'6" |
| #030 | 30 cu. ft. | 40" x 40" x 69" | 10'3" |
| #045 | 45 cu. ft. | 40" x 40" x 84" | 11'6" |
| #060 | 60 cu. ft. | 40" x 40" x 99" | 12'9" |
| #090 | 90 cu. ft. | 40" x 40" x 108" | 14'0" |
| #140 | 140 cu. ft. | 60" x 60" x 90" | 14'0" |
Custom Build / Ordering Guide
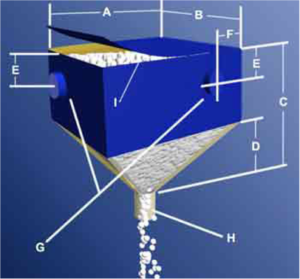
Use this diagram when talking to your ciF agent.
Length
Width
Height
Taper Height
Location of Fill Spout
Spout Length
Diameter of Spout


Installation
Tools & Materials needed:
- Standard Screwdriver
- Pliers
- Two Screws or Bolt Hooks for the Pulleys (Depending on the Ceiling)
- Two Screws or Nails for the Wall Cleat
- Place steel rods in sleeves at top of bag.
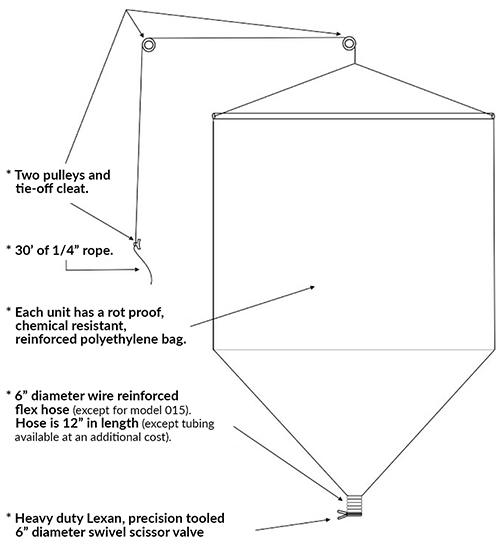
- Uncoil lanyard & rope and attach the lanyard to the steel rod ends.
- Put a 6" hose clamp under the webbing at the bottom of the bag, place wire reinforced clear tubing inside the bag & tighten the hose clamp. Put the next hose clamp over the tubing, now insert valve and tighten the hose clamp.
- As shown in sketch, attach the pulley to the ceiling and the cleat to the wall. Now thread the rope through the pulleys and hoist up the dispenser bag, tie off the rope at the cleat.
Tools & Materials needed:
- Standard Screwdriver
- Two Screws or Bolt Hooks for the Pulleys (Depending on the Ceiling)
- Two Screws or Nails for the Wall Cleat
- Two 7/16" Wrenches or Pliers
- Place 38 1/2" lanyard in sleeves at top of bag.
- Spread 54 1/2" lanyard to form an X and attach the ends to the four corners of the rods using the bolt & nut provided at the end of the rod.
- Put the hose clamp thru the webbing sleeve at the bottom outlet - put the scissor valve in the outlet and tighten the hose clamp.
- Hang pulleys from the ceiling above where the bag is to hang and over to where the rope will drop to the tie off cleat. Attach the cleat to the wall.
- Tie off one end of the rope to the cleat. Thread the other end thru the pulleys and then tie it to the eye bolt at the center of the lanyard on the bag.
- Fill the bag and hoist it to the ceiling and then tie the rope to the cleat. You are ready to dispense the loose fill materials.

a custom quote just for you.


